Putting up a QR code is not one single job. The same code can serve two purposes: showing guests the menu, or taking their order straight from their phone. Mixing them up disappoints both staff and guests: a guest who thinks they can order waits for the waiter, and a venue that set up a read-only menu wonders why no orders arrive. This guide explains the difference first and then the steps of a safe, efficient setup.
Comparing the three options
| Feature | Printed menu | Read-only QR menu | Table ordering (QR) |
|---|---|---|---|
| Updating prices and items | Needs reprinting | Instant | Instant |
| Who enters the order | Waiter | Waiter | Guest sends it, staff approve |
| Sold-out item | Told verbally | Shown in the current menu | Shown as "Sold out" in the menu |
| Waiter workload | High | High | Fewer trips, but approvals to handle |
| What the guest needs | Nothing | Phone and a connection | Phone and a connection |
| Best use | Any venue | Signage, website, window | Table-service restaurants and cafés |
The three methods can sit next to each other instead of replacing each other: a public menu link on the entrance sign, ordering codes on the tables, and a printed menu for whoever needs it.
Which one should you choose?
- An ordering menu: venues with a limited number of waiters, high table turnover and guests who decide quickly (cafés, quick-service rooms, busy terraces).
- A read-only menu plus waiter orders: restaurants where the waiter's advice and conversation are part of the sale and service quality sets you apart. The guest studies the menu on the phone and still gives the order to the waiter.
- Both together: you can run ordering at lunch and read-only at the evening service; ordering hours make that possible.
The flow on the guest and staff sides
The guest: scans the code at the table with their phone; no app to download, no sign-up. From the cover screen they go to the menu, browse categories or search. On the product page they pick portion, option groups, quantity and a note, then confirm the basket and send. After sending they follow the order on a status page: received, approved or rejected; after approval, preparing, ready, served.
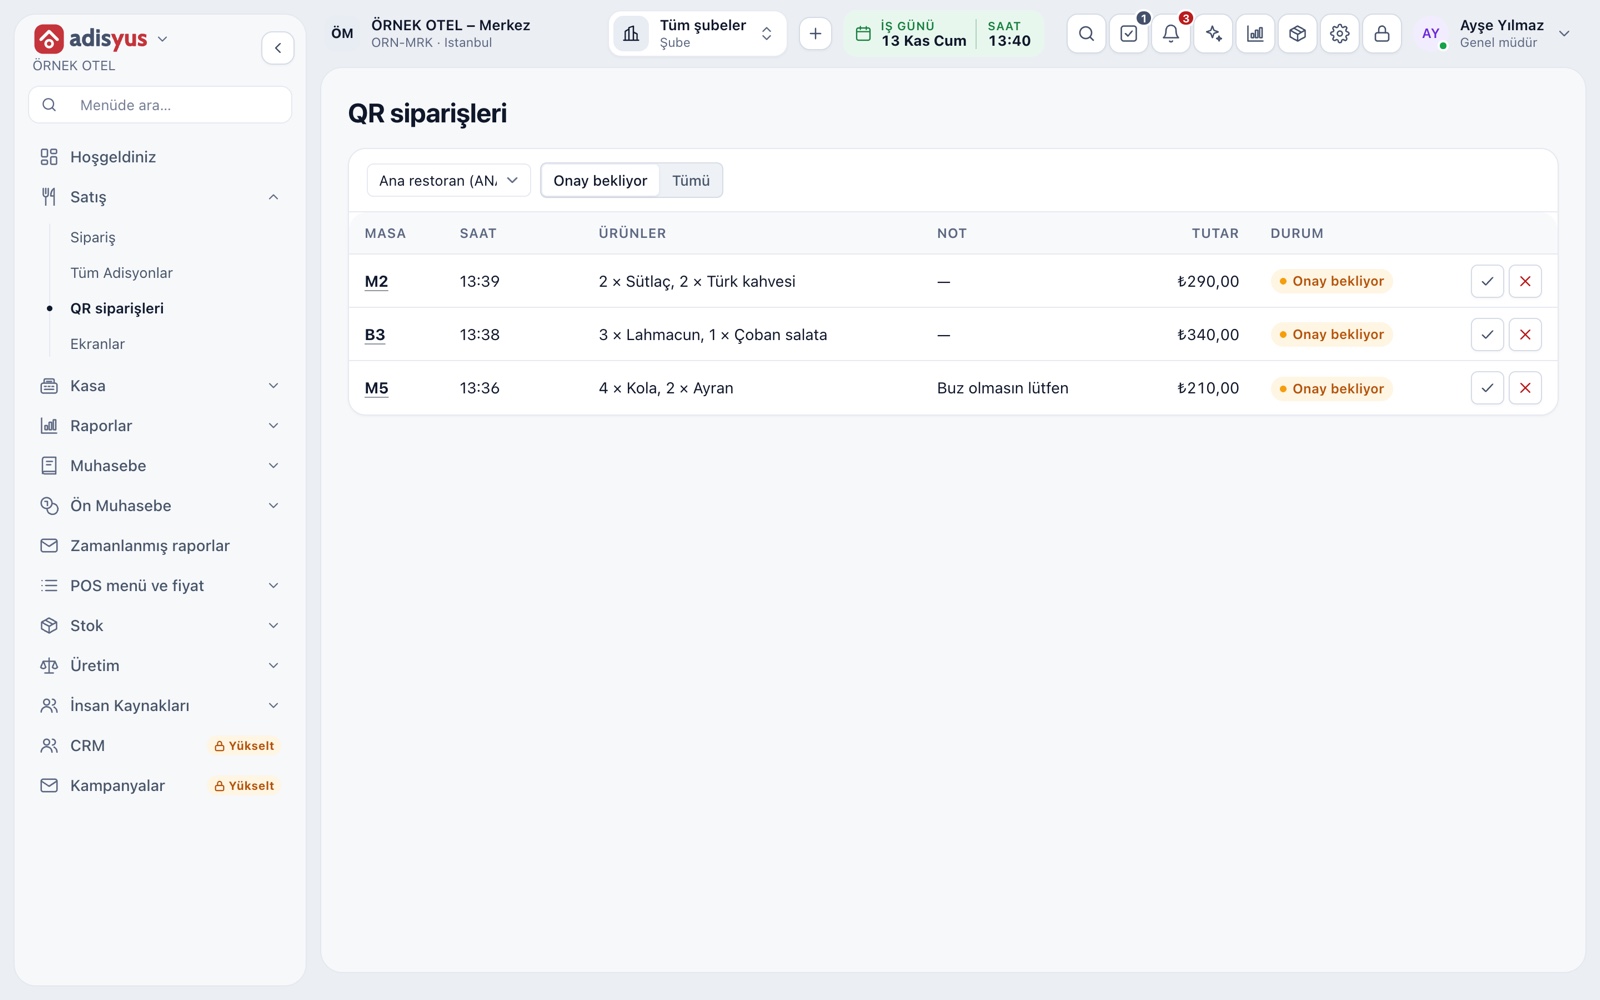
The staff: incoming orders are listed on the QR orders page with table, time, items, note and amount. When an order is waiting for approval, an alert appears above the service screen. An approved order is added to the table's open check and sent to the kitchen; for a rejected order, the reason you write is shown to the guest.
The approval flow: manual or automatic?
- Staff approval (default). An order from the wrong table, or sent as a joke, never reaches the kitchen. The extra work is that whoever approves has to keep watching the screen.
- Automatic approval. It removes the approval bottleneck in busy hours, and the order drops onto the check in the same step. The risk is an order landing on the wrong table; do not turn it on before you are sure the table codes sit on the right tables.
- Ordering hours. To stop orders arriving after the kitchen closes, you can set a time range; outside it, guests see the menu but cannot order.
Our advice is to start with manual approval for the first two weeks, look at the busy hours and the error rate, and then decide.
Keeping table codes secure
- Every table has its own code. The code is fixed: downloading or printing it does not change it.
- If a code is lost or falls into the wrong hands, renew it; the old code stops working immediately.
- To close a table temporarily, switch its code off; the table will not open a menu.
- The public branch menu is separate: it is read-only and takes no orders. It suits your website or social media.
- A single print page is prepared for all tables at once.
- Do a weekly visual check. Someone may stick another code over yours; glance at the tables when opening or closing.
The menu itself: one source
The QR menu should not be a separate menu; it should be fed from the same source as the sales screen. That way you do not update prices and items in two places, and the order stays the same. You may want to hide a product from the QR menu only; that is a product setting and does not require splitting the menu in two. When an item runs out, closing it for sale spares the guest from hearing "sorry, it's finished" after ordering.
Setup checklist
- Review product names, category order and prices.
- Write portions and option groups (doneness, extras) in plain names the guest will understand.
- Match the welcome text, logo and colours to your brand.
- Decide the ordering hours and the approval rule.
- Print the table codes and place them on a matte, high-contrast surface.
- Place a real test order at one table and watch it land on the check and in the kitchen.
- Decide in writing who watches the pending-approval alert.
- Teach the team to help guests: for a guest without a phone, or who prefers not to use it, the waiter takes the order.
- Keep a printed menu as a backup.
- At the end of the first month, review the share of orders arriving this way and the rejection reasons.
Common mistakes
- Removing the printed menu entirely. You leave out guests without a phone, with a flat battery or who simply prefer not to use it.
- Nobody owning the approval alert. The order waits, the guest calls the waiter and the efficiency gain disappears.
- Launching without testing. A wrong table code, a wrong station or a missing option shows up only in a real order.
- Treating ordering as paying. Ordering by QR does not mean the bill has been paid; payment is a separate flow.
- Placing the code on a small or glossy surface. A code that will not scan is the most complained-about problem.
Conclusion
Set up properly, a QR menu cuts both the guest's wait for the waiter and the floor team's trips; set up badly, it creates a new wait. Choose the purpose first, approve manually in the early weeks and keep the printed backup. For settings, table codes and the order flow in detail, see Smart Digital Menu.